What I wanted to achieve: be able to play KanColle while visiting my family in Hungary, without all the geolocking hassle. There is an update scheduled for the time I’m gone, so I can’t avoid reloading the game. Which means that I need a VPN or proxy in Japan so that DMM won’t block me out.
Plan: set up a Raspberry Pi box behind my router and use that as proxy.
The first step went without issue. Amazon had everything necessary on stock, so with express shipping I had the Pi 2 B+ (at first I was considering a Zero, but that doesn’t have ethernet on board and I didn’t feel like soldering now), a case, a micro SD card and a power adapter for it. Setting it up was much easier than I thought. I just grabbed the Jessie Raspbian lite image from the official site, and burned it on the memory card (alas I have no card reader on my desktop so I used my phone for the purpose). The Pi was up and running, me controlling it through SSH in… I don’t even know, ten minutes after the delivery guy handed the package over?
Time to connect to it from the outside! And reliably, too. The latter part is a bit problematic. As anyone who follows me on twitter probably knows, my “ISP” (J:COM) is horrible and disconnects/lags out regularly. Which means that while the Pi is safe behind my router, I would have no means to find out its internet IP if it got a new one after a connection drop without it telling me first. At first I was considering a very noob solution – set up a cron job that checks the external IP and uploads it in a text file to my VPS. Using that I could then directly connect to the Pi and everything would be fine.
Would. Except my router (a Buffalo WZR-600DPH3) refused to forward port 22 for some reason. No matter how I tweaked the settings in the router’s GUI, it wouldn’t work, and not even a firmware update could change that. Which meant that directly connecting to the Pi was out of question. Luckily I was uploading the IP address file via SSH, and while I was googling how to do that, I stumbled upon this wonder called a reverse tunnel. Just what I needed.
Thus the plan turned into the following: have the Pi open a reverse SSH tunnel to my VPS and set up a local loop on the VPS to allow the tunnel to work as a SOCKS proxy.
Of course it wouldn’t go smoothly. I’ve never used SSH like this – logging on to my VPS was pretty much all I used it for. So setting things up, finding the best options and making sure I wouldn’t have the tunnel open for all the super hakers of the world took quite a lot of googling and experimenting.
I also made a limited user account on the Pi to use with the tunnel, in case someone tried some hacking magicks. Locked them into the user folder with rbash (about all I can do with my measly knowledge of linux).
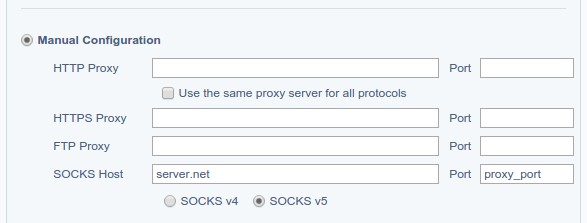
The end result was just as I described above. A cron job on the Pi to keep the reverse tunnel alive in case the connection drops, a dynamic port forward on the server, then the proxy settings for Chromium. It’s surprisingly important to only set the SOCKS proxy, and keep the other protocols empty, otherwise the connection would fail with a protocol mismatch. I use the Proxy Switchy plugin to make switching easy.
pi_user@raspberrypi:~ $ cat tunnel.sh

#!/bin/bash

createTunnel() {

  /usr/bin/ssh -i /home/pi_user/.ssh/id_vps -N -R tunnel_port:localhost:22 vps_user@server.net

  if [[ $? -eq 0 ]]; then

    echo Jump tunnel created

  else

    echo Jump tunnel error: $?

  fi

}

/bin/pidof ssh

if [[ $? -ne 0 ]]; then

  echo Creating tunnel

  createTunnel

fi
vps_user@vps:~$ ssh -CqfgND proxy_port -p tunnel_port pi_user@localhost
user@laptop:~$ ssh -vvvND proxy_port -p tunnel_port pi_user@server.net

This way I can just use the server’s port as proxy for easy mode, or run the dynamic loop locally on my laptop, and connect it directly to the Pi’s tunnel if I need every bit of the connection encrypted (public wifis etc).
